
Let’s get into the implementation part. Let’s consider several scenarios of color swapping, we will start with a simple to color swap image (by simple I mean the color distribution doesn’t vary much) and gradually go on to the examples where the image has a varied color distribution where it would be quite tricky to swap a particular color of choice.
Let’s consider the image below. It looks like a green pen with a plastic body, consisting of a metallic nib, and a green plastic cap with some metallic part and a black design at the top.
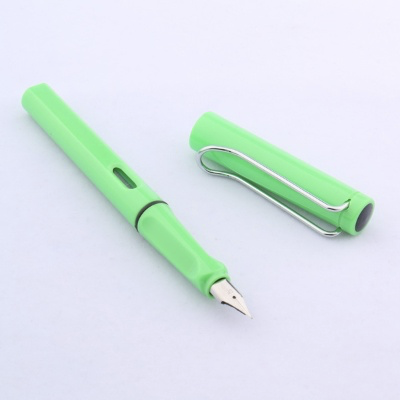
Now, We want to change the color of the pen’s body from green to say violet and want the resultant image to be as realistic as it is originally and need all the illuminations and shadows to get considered in the resulting image. Can we do it in the RGB space? Let’s give it a try. Note: when an image is loaded with the help of the Open-CV library, the range of components in a particular color space is usually from 0 to 255.
Now, the reason for this strange resultant image is that:
- RGB space specifies both the color and the intensity information with the help of all the three components (R, G, and B).
- Every pixel in an RGB image is a specific combination of these components and we cannot interpret by how much amount a component needs to be changed to get the desired color.
- Any change in any of the R, G, B components, would bring a change in both the color and the intensity value of a pixel.
It would have been quite easy to swap the color if there was a space where both the color and the intensity information would have been specified in separate components independent of each other. This is where color spaces like HSV and LAB come into the picture. Now let’s try swapping the pen color by changing the hue values in an HSV color space.
Similar to how changing the hue values don’t affect the brightness component of the image, let’s check if we can change the brightness of the image without disturbing the color/hue component of the image.
Clearly, it was quite easy to play with different components in an HSV color space. We saw how modifying different components helps us transform the color component and brightness of the image separately.
Multiplying the brightness channel by 0.6 (darkening effect) also resulted in the darkening of the background. In earlier images also, we saw changing the hue value resulted in a change in the background color.
Let’s examine how we can only change the color of the pen or only change the brightness of the foreground without changing the background. Note, there are other deep learning-based techniques like GANs that also can be used to achieve the same, in this article we only talk about simple image processing techniques that solve the problem.
The idea will be to create a color range binary mask either for the background or foreground and then use that mask to selectively apply the color change to the foreground. But, mask for which color? To answer the question it would be good if we plot the histogram for our hue/color channel. Here is how our hue channel and histogram looks like:
The histogram above implies that the peak occurs at ~160 which is mostly the background color green. The pen with a hue of blue peaks at ~80–90. This is how our mask looks like:
Now, let’s increment the hue value of the non-zero pixels in this binary mask.
And that’s how we were able to successfully swap the color of the image without manipulating the background color.
Lastly, I would like to give a small note on the Choma Keying method which is quite popular in TVs and movies. This technique can also be used to swap colors in images. Here the idea is to start with two images, one a foreground installed in a green or black screen and second the image that needs to be superimposed in the background. The approach is to first extract all the green or black pixels in the image, make these pixels transparent which will enable us to overlay the desired image in the background. But, this method requires the surfaces to be highly smooth with very minimal illuminations.